Technical support can be reached at support@katoombasound.com
Support documentation can be downloaded from: Katoomba Sound Documentation
Speaker Troubleshooting
NOTE: each time you activate (turn on) an additional pair of speakers, the audio volume for the already active speakers will be reduced (the volume will drop noticeably). This is because each additional activated speaker pair increases the load on the amplifier. This is not a speaker switch malfunction. It is the inherent nature of the electronics of speaker amplification. As a result, it is best to operate your speaker zones with the least number of active zones. The speaker switch defaults to two (2) maximum active zones/speaker pairs. It is preferable to use two or even one maximum active zones. Use of more than 2 active speaker pairs is not recommended.
Basic Speaker Testing Tips
1. WiFi signal problems might cause zones to appear to unreliably or erratically switch on or off.
- Go to the speaker switch and make sure that speakers are reliably activated/deactivated when you press speaker buttons via a browser.
- Take note that the speaker switch changes the zones within less than a second after you press a button in the browser page.
- If you find that access to the speaker switch via the browser results in slow or unreliable changes to the zones then you will need to check that there is adequate WiFi signal where the speaker switch is located.
- You may have to assess the reliability of your WiFi network in general.
1. For testing, disconnect *ALL* of the speaker connectors and insert one at a time and check that each pair of speakers work (without any other speaker pairs active, all others are turned off).
2. Once you confirm that BOTH speakers work and are sounding in the correct zone location, disconnect that speaker connector and move on to the next zone. Repeat the testing for each individual zone.
3. Test to make sure that both left and right speakers are operating correctly in each zone. Make sure that no other zones are activated (all other zones are switched off).
Speaker Switch does not Power Up
When the speaker switch is first powered up, the left LED indicator (1) will light up.
And as the boot process continues, all seven LEDs will flash five times.
If the speaker switch does not appear to power up then follow these steps:
1. Make sure that the Power Supply Adapter is plugged into a wall outlet.
2. Make sure that the wall outlet is turned on.
3. Make sure that the wall outlet micro USB connector is inserted fully into the USB micro socket on the rear of the speaker switch.
4. Press any one of the seven speaker switch buttons.
5. If one or more of the LED indicators light up then the speaker switch is powered on and is operating.
6. If no LED indicators light up, then press any one of the seven speaker switch buttons a second time.
7. If one or more of the LED indicators light up then the speaker switch is powered on and is operating.
8. If none of the LED indicators light up then power cycle the unit by removing and then reinserting the power supply adapter micro USB plug.
9. When you plug in the micro USB plug, the left hand LED indicator for speaker 1 will light up.
If LED 1 does not light up then no power is reaching the unit or the unit is faulty. Check the power first before contacting technical support.
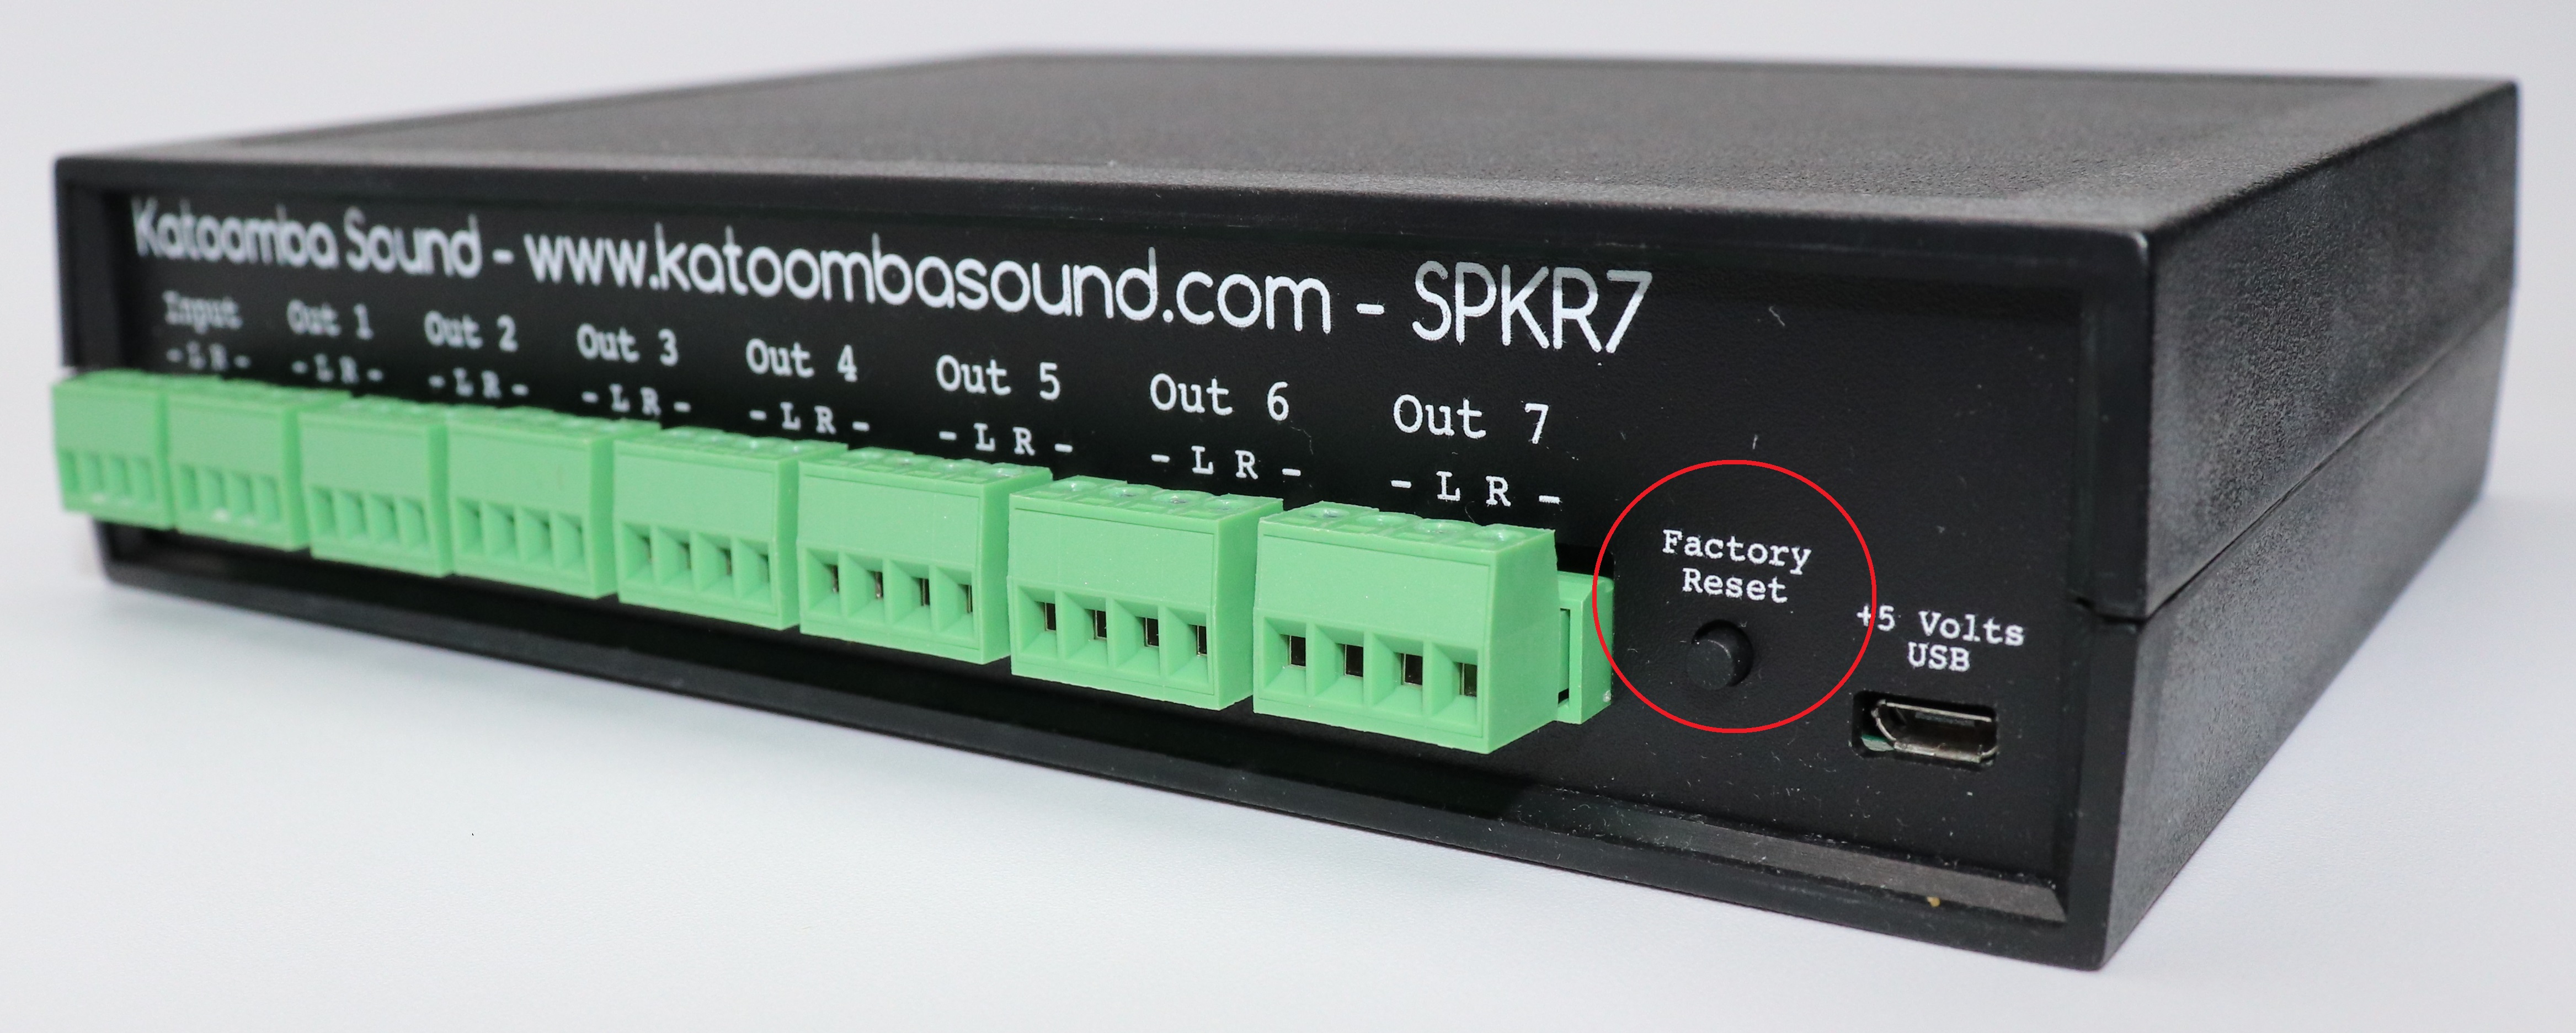
Reset to Factory Defaults (or downgrading software updates)
To reset the speaker switch back to the factory default settings, press and hold the "Factory Reset" button for approximately ten seconds.
The reset button is found on the rear of the speaker switch unit on the right hand side next to the power connector.
When the reset button is pressed for at least ten seconds, the first LED (LED 1) will begin flashing and the speaker switch will reset back to factory default settings.
The reset process takes approximately 45-60 seconds (which includes rebooting the speaker switch).
IMPORTANT: You can reset (downgrade) the speaker switch software back to the previously installed (default.tar) software update by pressing and holding speaker button 7 and then pressing and holding the "Factory Reset" button simultaneously for approximately 10 seconds.
Resetting the speaker switch in this way will revert the unit back to the software version that it was shipped with from the factory (or to the last installed default.tar package). If this process is used it will be necessary to reinstall the latest (or desired) software update/s after the unit restarts.
See the picture below that shows the location of the factory reset button.
WiFi Authentication Type
The WiFi authentication type is WPA2-PSK only. The speaker switch does not support any other WiFi authentication type.
Internet Access Requirements
☑ - The speaker switch *MUST* have access to a DNS server. The DNS server may be acquired by DHCP or statically configured (in the "Network" tab). Either way, the speaker switch will need to have network access to the configured DNS server.
☑ - The speaker switch *MUST* have access to the following Katoomba Sound 'phone home' URL: https://www.katoombasound.com/tools/SpeakerSwitchPhoneHome.php
☑ - The katooomba sound IP address (as of August 2024) is 69.163.177.231.
☑ - The speaker switch *MUST* have access to pool.ntp.org IP addresses on UDP port 123 (NTP). See: NTP Pool Project
☑ - No other access to the Internet is required.
Speaker Switch Not Found on the "Find My Speaker Switch" Page
If the speaker switch device does not register and cannot be seen at: Find My Speaker Switch.
☑ - It may be easy to find the speaker switch device IP address by examining the DHCP leases on your DHCP server.
☑ - You can manually trigger the registration by momentarily pressing (< 1 second) the "Factory Default" button on the rear of the speaker switch unit.
☑ - The unit should then connect to the URL: https://www.katoombasound.com/tools/SpeakerSwitchPhoneHome.php.
☑ - The request to the above URL will also include a query string section (which must also be permitted through your firewall - if URL filtering is enabled).
☑ - And the device should then appear in the results of a Find My Speaker Switch scan.
☑ - See Find the Speaker Switch for additional details.
Fuse Replacement
The speaker switch contains two overload fuses that will provide protection against excessive speaker power use. If one or both of the speakers fail to produce audio but the amplifier is found to be OK then it is possible that the fuses may have "blown" and they will need to be replaced. To replace the fuses:
☑ - Obtain two replacement fuses. Use 3 Amp fuses for 100 Watt load. Use 5 Amp fuses for 200 Watt load. Use 8 Amp fuses for 250 Watt load.
☑ - Disconnect power and all speaker connectors from the speaker switch.
☑ - Use a philips head screwdriver to open the speaker switch.
☑ - Remove the existing fuses. Check with a multimeter (set to ohms measurement) to see if they are still working. If they are still working, check your amplifier and speakers for correct operation.
☑ - If the fuses are blown (show open circuit on a multimeter), then replace the fuses. IMPORTANT: Check for the reason why the fuses blew out. Are you setting your amplifier too loud or are you trying to operate too many speakers simultaneously (or some other cause). Fix any underlying problem that would have caused the fuses to blow.
☑ - Replace the speaker switch case cover and replace the two philips screws. Do not over tighten the screws.
☑ - Replace the amplifier connector, speaker connectors and USB power connection.
Device Task Timing
When administrative actions or tasks are performed on the speaker switch, the device provides an indication of what is happening by showing LEDs scanning back and forth and then flashing all of the front panel LEDs.
When a task is initiated, the device requires time to complete the task. When the task is complete, the LEDs on the front panel will all flash a number of times. The table below shows the time it takes for each task to complete.
Action - Task
Time Required
LED Flashes
Reset to Factory Default Settings(web page and rear push button)