Setting up the speaker switch network connection requires some preparation (and patience).
The following items are needed:
1. The WiFi SSID name to which you want the speaker switch to connect. This would typically be an SSID in your home WiFi network.
2. The password for the SSID to which you want the speaker switch to connect.
3. The WiFi network should have access to the www.katoombasound.com. For details, see Internet access requirements.
4. Patience, so that you give the speaker switch enough time to reconfigure itself when connecting to the home WiFi network. For network tasks timing details, see: Speaker Switch activity timing.
Summary of Network Setup Steps
Step 1 - Plug in power to the speaker switch unit.
Step 2 - Use a computer, laptop, mobile, or tablet to connect to the speaker switch via its WiFi.
Step 3 - Configure the speaker switch to connect to your home WiFi network.
Step 4 - Connect your computer, laptop, mobile, or table to that home WiFi network.
Step 5 - Discover (find) the speaker switch on the home WiFi network.
Step 6 - Configure the speaker switch options and then use the speaker switch.
Step 1 - Power Up
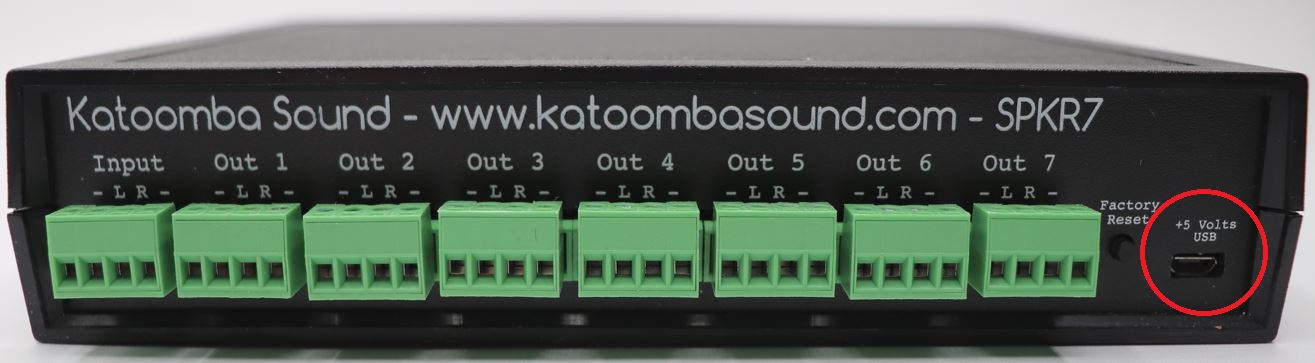
Plug the USB power supply into the power socket at the rear of the speaker switch.
See the picture below that shows the rear of the unit. Note the orientation of the USB micro "D" socket (seen in the picture below in the red cirle on the far right of the device).
The USB micro "D" power plug must be inserted into the jack with the longer side of the D aligned with the high side of the jack.
Once the USB power is inserted into the unit, LED 1 (on the front panel) will light up.
If LED 1 does not light up then go to the initial power up section in the Q&A section.
The speaker switch will take about 1 minute to complete its start up process.
IMPORTANT: Allow 1 minute for the start up process to complete. When the start up process completes, all of the front panel lights will flash five (5) times.
Step 2 - Browse the Speaker Switch
Connect a laptop (or other network enabled device) to the speaker switch WiFi using SSID: "katoombasound" and password "thethreesisters".
Wait about 30 seconds for your laptop to connect to the speaker switch.
Once connected, open a browser (Chrome, Edge, Firefox, Safari,..) and go to URL http://192.168.4.123.
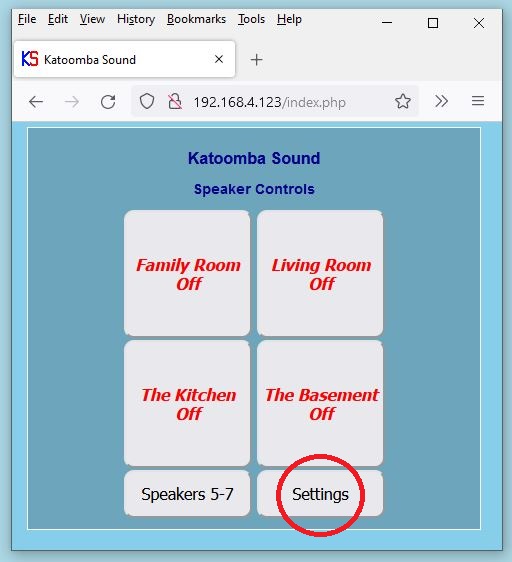
You will be presented with the main page of the speaker switch. See the picture below. NOTE: At this time, the speaker switch WiFi does not have access to the Internet. So the laptop (or other device) may show a network status of "No Internet" when connected to the speaker switch. This is normal behavior.
As long as you are able to connect to the speaker switch and see the speaker controls page (below), you can proceed.
Click (or press) the Settings button (which is circled in red in the picture above) and the Status screen will appear, as seen in the picture below.
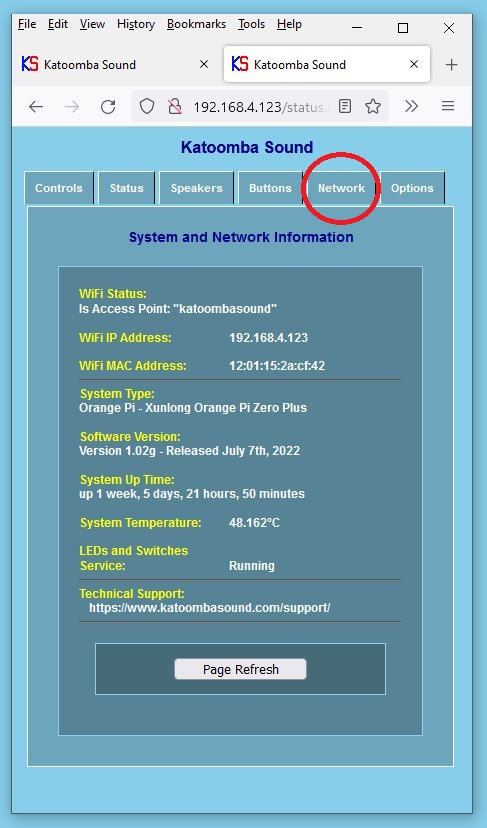
Click on the Network tab (which is circled in red in the picture above). You will be presented with a web page like that shown below.
Step 3 - Connect Speaker Switch to WiFi
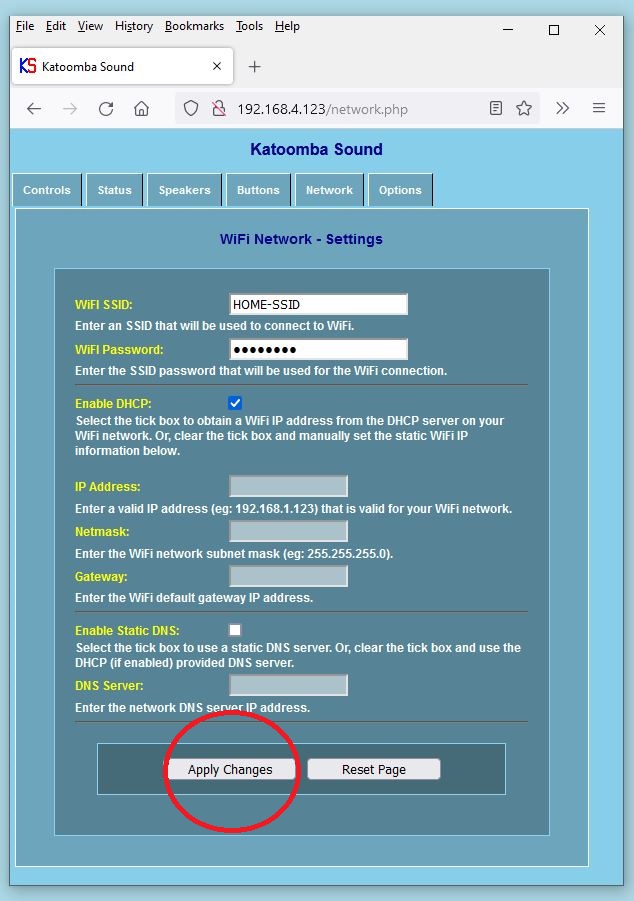
Click on the WIFI SSID field (see the WiFi SSID 'katoombasound' shown in the picture above).
1. Type in your WiFI network SSID to which you want the speaker switch to connect. In the picture below, we have used an example SSID - HOME-SSID. The SSID that you enter will be for the network that you wish the speaker switch to connect to.
The password and network fields will appear after you enter the WiFi SSID.
2. Type in the SSID password that corresponds with your chosen network SSID.
3. Double check that you have entered the correct SSID name and password.
IMPORTANT: If you enter the wrong SSID or password and the speaker switch fails to connect to your WiFi network, the speaker switch will need to be reset back to the factory defaults. For details see reset the speaker switch to factory defaults
4. Choose your network settings. You can use the default network settings (DHCP) or you can set up your own static values. If using DHCP, ensure that your DHCP server (usually your Internet router) provides the proper configuration items (IP address, subnet mask, default gateway, and DNS server).
When using static values, ensure (and double check) that all settings used are correct for the WiFi network.
IMPORTANT: If you enter the wrong static information and the speaker switch fails to connect to your WiFi network, the speaker switch will need to be reset back to the factory defaults.
5. Click on Apply Changes (shown circled in red in the picture above) and when the confirmation pop up box appears, confirm the changes by clicking on the "OK" button (shown circled in red in the picture below).
The speaker switch will now try to connect to your home SSID WiFi network.
At the same time, your laptop (or other device) will be disconnected from the "katoombasound" WiFi network because the speaker switch turned off the "katoombasound" SSID. If the speaker switch is able to connect then it will be using an IP address assigned from your home WiFi network.
Allow up to 40 seconds for the WiFi connection process to complete.
Now, you must reconnect your laptop (or mobile device) to your home WiFi network.
Step 4 - Find the Speaker Switch
We will assume that the speaker switch successfully connected to the home WiFi network. Now, we need to find the IP address of the speaker switch.
☑ - Open your browser and click on or go to: https://www.katoombasound.com/tools/FindMySpeakerSwitch.php. A page similar to the one shown below should appear.
☑ - If the speaker switch is connected to your home WiFi network then its IP address should appear next to "Last Detected Speaker Switch (SPKR7)". In the picture below, the IP address is 192.168.1.50. The IP address appears with orange text and is a link that, when clicked, will open a new browser page that will be connected to your new speaker switch. Congratulations!
☑ - You have successfully configured the speaker switch to connect to your WiFi network AND have been able to connect to the speaker switch from your own device (laptop, tablet or mobile).
☑ - In your browser, bookmark the link to the speaker switch. Or, keep a record of the speaker switch IP address.
Now you can move on to: using the Speaker Switch.
If the speaker switch IP address does not appear next to "Last Detected Speaker Switch" then continue onto the next step.
Step 5 - Scan for the Speaker Switch
It is possible that the speaker switch was able to connect to the desired home WiFi but the speaker switch was not able to register with the Katoomba Sound registration service.
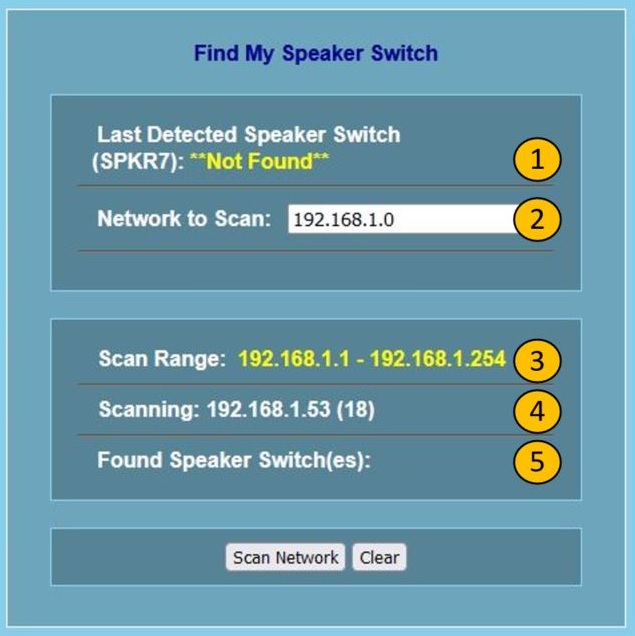
If registration fails then the speaker switch IP address will not appear next to the "Last Detected Speaker Switch" field. An example of this is shown in the picture below. Notice the yellow text: "**Not Found**".
Registration failure usually happens because the speaker switch does not have access to the Internet. Instead, we can scan the network to find the speaker switch IP address.
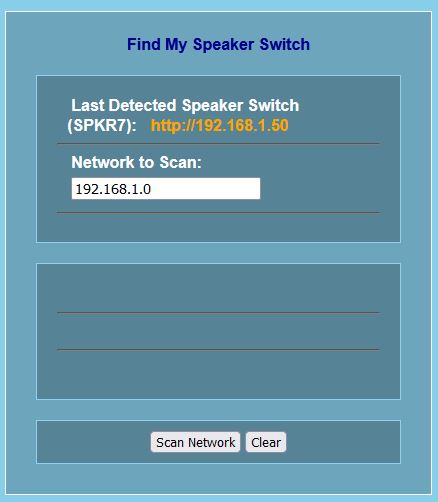
The picture below shows the "Find My Speaker Switch" tool which can be accessed here: Find My Speaker Switch.
☑ - Enter the WiFi network address into the "Network to Scan" field (shown below in the red rectangle). The address you use must be from the WiFi network into which the speaker switch is connected.
If you don't know the WiFi network address then try each of the following four methods listed below to find the IP network/address:
1) - Enter the IP network/address of the WiFi network that you configured the speaker switch to connect to.
2) - Enter the IP address of your phone, laptop or tablet - that is connected to the same WiFi SSID that the speaker switch is connected to.
3) - Enter the network address from the WiFi network side of your home router (modem).
4) - Try 192.168.0.0 and 192.168.1.0. These are commonly used in home networks.
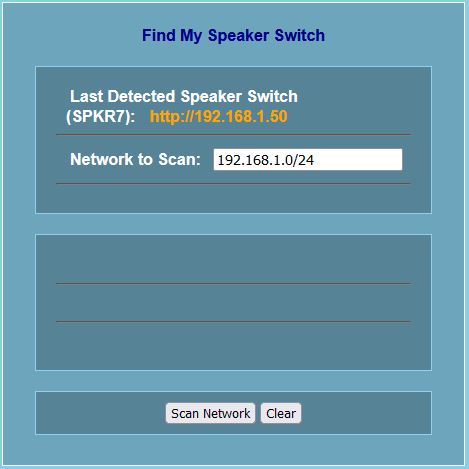
☑ - Networks are scanned by:
1) Pressing the "Clear" button.
2) Entering the network that you wish to scan into the "Network to Scan" field.
3) Pressing the "Scan Network" button.
4) Waiting for the scan to complete. Scanning is complete when "Scanning" changes to "Scan Finished".
5) If no speaker switch devices were found then scan another network by repeating steps 1 to 4.
When the scanning process is started, the page will change to show scanning progress and discovered speaker switch devices.
The picture below shows five markers next to each of the fields on the page. Each field has a purpose:
1) **Not Found** indicates that no speaker switch was found by automatic device registration.
2) The network that is to be scanned is entered into the "Network to Scan" field.
3) The "Scan Range" shows the range of IP addresses that are being scanned.
4) "Scanning" shows the IP address being scanned and also shows the number of IP addresses (in brackets) that have been scanned so far.
5) "Found Speaker Switch(es)" shows each of the discovered speaker switch IP addresses as URL links.
When a speaker switch automatically registers, the "Last Detected Speaker Switch" field will show the registered device URL.
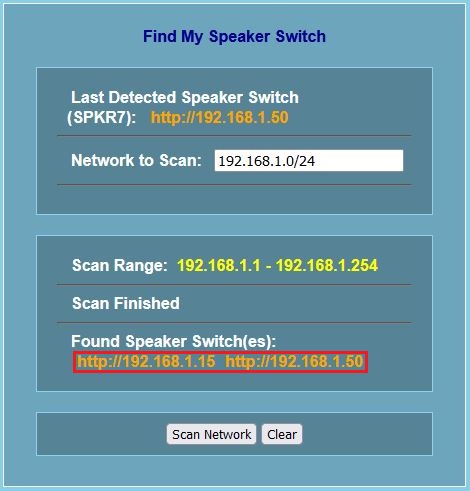
The picture below shows http://192.168.1.50 as the latest automatically registered device. You can click on the link to go to the speaker switch main page.
In the example shown below, you would click on "http://192.168.1.50".
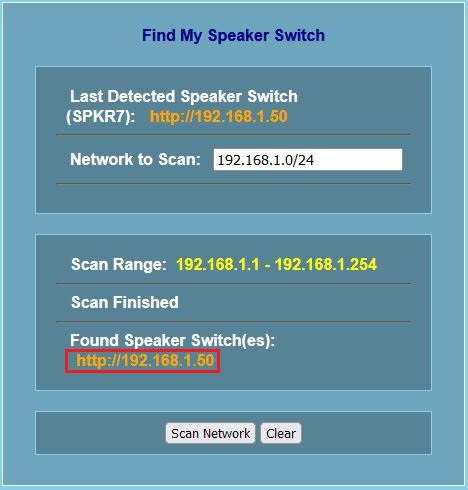
When a scan is performed, speaker switch devices that are found during the scan will be shown as URLs next to "Found Speaker Switch(es)".
The picture below shows http://192.168.1.50 as a speaker switch device that was found during a scan. You can click on the link to go to the speaker switch main page.
If there are more than one speaker switch devices found on the network, they will all be shown. In the picture below, two speaker switch devices were found by scanning.
Click on either link to go to the main page for each device.
Operating the Speaker Switch
This completes the network setup of the speaker switch device. If you successfully connected to your Speaker Switch then in your browser, bookmark the link to the speaker switch.
Or for immediate and future use, keep a record of the speaker switch IP address.
Now you can move on to: using the Speaker Switch.
Or, you can setup general options at: setting up Speaker Switch options.
If you were unable to connect to your Speaker Switch then repeat all of the above steps and if still not successfull, check the
help pages.